One of my favorite reasons for working in Scratch is that I can see, very clearly, how my code works. I see immediate results and can iterate based on what I see. That makes following my “what if…?” ideas easy and usually leads to even more learning and discovery. Designing activities that encourage these explorations helps students further their understanding of computational thinking concepts and practices.
Here is a fun Scratch art project I created recently that teachers could use with their students, whether they are meeting in person or remotely. It’s a project that could be used in an art class, or in any class to let students explore some of the blocks in Scratch prior to doing a bigger project. I have written this as a blog post for teachers to read and follow, but it would be easy to adapt for students.
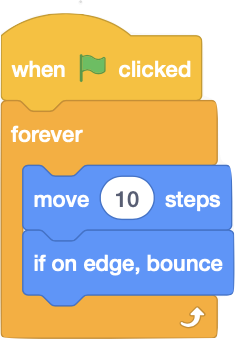
We start by replacing the default cat sprite with a ball and coding it to bounce. You may select a pre-made ball sprite from the Scratch library, or you may draw one yourself using the paint editor.
Here is the code that gets things started. With just four blocks, we have infinite movement. To make the ball move faster or slower, change the number of steps it moves. Just type in different numbers and see what happens when you run the code.
This is one of the simplest bits of code to write, and it is a great starting point, but it’s not very exciting to watch. So let’s add two blocks that will make this more interesting. At the start of the code, immediately under the green flag block, the ball will pick a random direction before it starts moving.

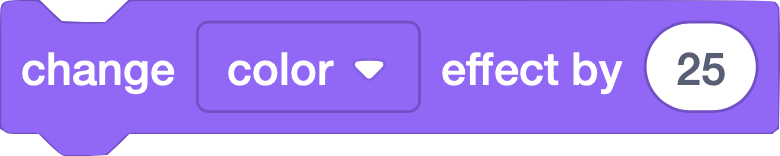
Now the ball moves around the screen in more interesting ways, but it’s still just a ball. Let’s add one more block to make the project more visually interesting by making the ball gradually change color. Add the color change block at the start or end of the code inside the Forever loop. Make the number smaller or larger to find one that creates a color progression you like. Keep in mind color values range from zero to 100.
Let’s add a new block inside the Forever loop that will fill up the screen:
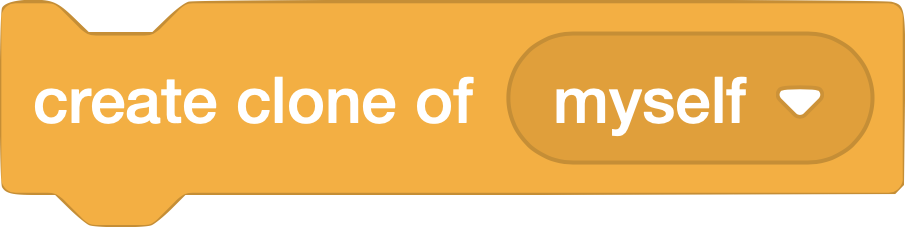
By creating clones, the screen will fill up with identical copies of the ball. Unfortunately, there is a limit to how many clones can be on the screen at one time. When we reach the 300 clone limit, the code will stop.
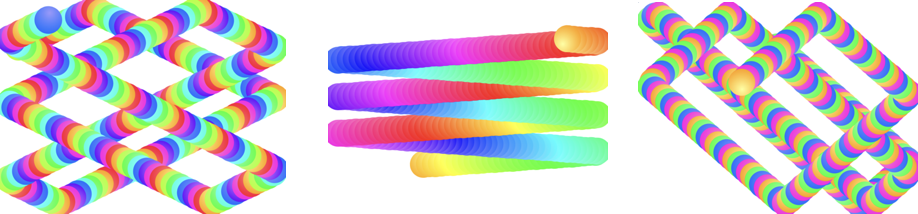
Try different values for changing the color of the sprite to see how the resulting design changes. Here are three designs I captured as my code was running with three different values in the change color block.

Now we are getting to the fun part. Once we have clones, we can give them their own code. Let’s start by making the clones fade over time and then disappear. This will let our code run longer regardless of the 300-clone limit. As new clones are created, old ones disappear. As long as it all happens with the timing in sync, the code will run forever.
Notice the change effect block now reads “ghost” instead of color. If you have never clicked on the pull-down menu in this block, you might want to explore what happens when you select the other effects available before continuing. I especially enjoy the mosaic effect here.
Another important detail to know is that effects go from zero to 100. Zero means there is no effect and 100 means the effect is at its maximum. If we start with zero ghosting effect and change it by 25, this means that after four repetitions, our clone is invisible. Change the value so that we can actually see the clone for all 10 repetitions in this loop.
Now play with the number of repetitions and the ghosting effect change to make the trail of vanishing clones as long as you can. Remember you can use decimal values in the blocks. Here are a couple of examples from when I ran the code using 300 repetitions and ghost effect changing at .3 per iteration.
Let’s add another block to the code for the clones. Try adding a color change block. Play with the values. Here are a few things you can try to see how the design changes.
- Try having the color change value in the first stack of code match the color change value in the clone code.
- Have the change value be higher in the clone code than in the original sprite code. Then reverse the values. Pay attention to how the color seems to move along the trail.
- Have the numbers be close to one another. Then have the numbers be far apart from one another.
- Make one of the values higher than 50.
NOTE: Be careful when you do some of this. The flashing effect you may get from some of these combinations may be dangerous for people affected by strobing lights.
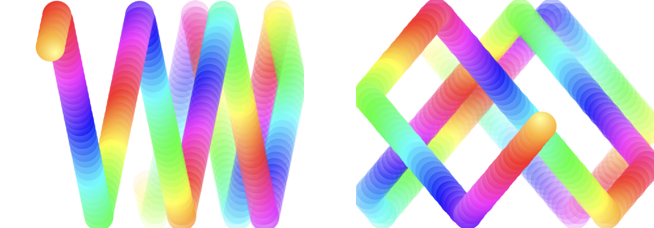
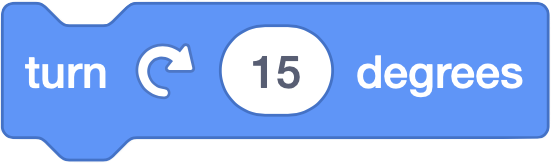
By now you have probably noticed that the patterns in which our sprite moves can be predictable. Even if we have coded a random number into the code, because the ball is always bouncing off the edge, the patterns become repetitive. Let’s add a block to change the look of the project.
Inside the loop in the code for the sprite, add a turn block. Run the code with the default 15 degrees.
As you change the value of the turn, your design will change. Here are a few things to try.
- Try higher and lower numbers.
- Try changing the number while the code is running.
- Try adding a negative sign to the number while the code is running.
- Try adding a random number block that will select a number between 0 and 5.
- Try changing the random number range to -5 and 5.
There are many other ways in which you can make this project your own.
Adding a backdrop can make the design more interesting. Adding code to the backdrop so it changes colors slowly might be interesting, too. The backdrop could be a solid color, or have a pattern of its own.
Add a costume to the sprite that has multiple colors in it. You may draw your own, or select one from the library. For example, I tried running the code using the bananas as my costume. The result was interesting, but because the bananas are just yellow and black, I decided to try with a more colorful sprite, like the ladybug. That was much more fun.
If you are an experienced Scratch user, it might be interesting to add some interactivity to your code. For example, the up and down arrows might change the rate at which the color effect changes for either the sprite or the clones. The right and left arrows might control the direction of the sprite.
If you have experience using the sensing blocks, you may want to make the design respond to its environment. You could use a sensor to control some aspect of the code. For example, if the room is loud, the color might change faster, or the angle might become more extreme. You may want the code to respond to movement detected by the camera so the viewer can control the design just by waving a hand.
As always when working with Scratch, there are infinite possibilities for making something fun that reflects your preferences as a creative coder and leads to lots of learning, too.
While this project makes an interesting visual display, much of the code used in it can be adapted for use in other projects. A game similar to Centipede could use a chain of cloned sprites moving together, for example. Beyond the obvious coding, though, there are many explorations and real life applications of concepts we teach too often in a disembodied and abstracted way, confined to worksheets and multiple choice tests. And while I do not believe everyone needs to be an expert coder to be successful in life, this is a much more meaningful way to learn.